Getting Started
How to
Brushes
- Nature Brushes
- Warping Brushes
- Background Copy Brush
- Bend Brush
- Drift Brush
- Radial Wave Brush
- Rotation Brush
- Turn and Fold Brushes
- Wave Brush
- Zoom Brush
- Glitter Brushes
Static Animations
Wave Brush
Description
Wave Brush allows you to add a pure periodic wave effect to the image. While, this tool is useful for animating pictures of the sea, oceans, lakes, and rivers, there are also many other uses. You can animate hair, clothes, leaves, and grass –in fact anything that can wave, throb, or ripple!
How to use Wave Brush
1. Select the Wave Brush from the Add New Animation dialog. The brush is located under the “Animated Brushes” section in the “Warping Brushes” subsection.
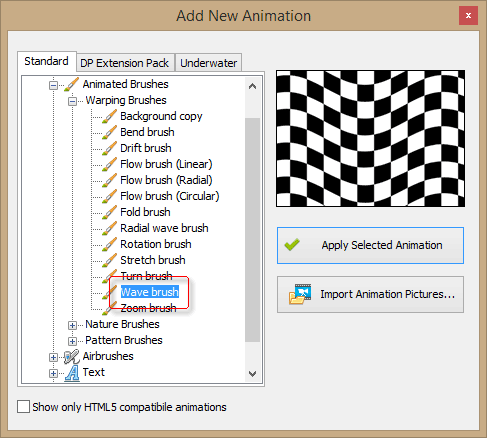
2. Click “Apply Selected Animation”. This adds Wave Brush to the list of Animations on the right.
3. Paint with Wave Brush over the area you want to animate. For instance, if you are animating hair, paint over the hair. You may need to adjust the waving speed, direction and type (see below). You are done! Here’s how it looks in dynamic:
Brush Properties
Let’s take a closer look at what Wave Brush has to offer. There are not that many options, but with some adjustment and properly combining of them you can create some interesting effects.
Wave Properties
This tab contains all settings of Wave Brush.
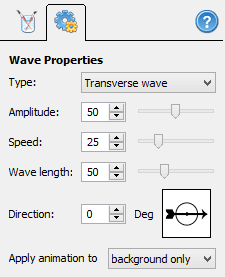
Type – this parameter sets the type of the wave. There are two types of wave available: longitudinal waves and transversal waves. In a longitudinal wave, pixels swing along the direction of the wave, back and forth. In a transversal wave, pixels swing across the direction of the wave.
| Longitudinal waves | Transversal waves |
What type of wave do you need? choose transversal waves if you want to animate lotus flowers waving on the surface of the lake or a flag fluttering in the wind. Longitudinal waves are good to imitate various distortions. With it, you can create effects of being underwater, or a heat rising up from a bonfire, and so on. To animate cloth you can use both the longitudinal and the transversal wave effects.
Amplitude – this is simply how big the waves will be. The higher the amplitude, the longer each animated pixel shifts from its original position, be that transverse direction or longitudinal.
Speed – animation speed. Higher values produce faster animations. The optimal value of this parameter is dependent on the scene and the object you want to animate.
Let’s say you have a picture of the shark. Surely, sharks are very fast, but that doesn’t make them nervous. Their tails are gracious, so you should use lower values of the Speed parameter for more natural animation. On the other hand, a faster wave effect allows you to animate objects belonging to agile creatures, like a snake’s tail or tongue.
Wave length – this parameter sets the distance between two nearest wave peaks. Longer waves are used for slower objects like the shark in the above example, while short waves can be used for water ripples, or trembling of the leaves.
Direction – specify where the wave should propagate. If you animate a flag, use the direction of the wind. If you animate water, use the direction of the stream. The rule of thumb here is: the orientation of the wave should be in line with the orientation of the object, and the wave should face the same direction as the object.
However, sometimes you can create interesting effects by breaking this rule. Feel free to experiment!
“Apply animation to” – you can choose between applying to "the background only" in which case the effect will ignore all below layers in the area of the effect mask, or "the whole scene" in which case the effect will animate all underling objects and effects.