Getting Started
How to
Brushes
- Nature Brushes
- Warping Brushes
- Background Copy Brush
- Bend Brush
- Drift Brush
- Radial Wave Brush
- Rotation Brush
- Turn and Fold Brushes
- Wave Brush
- Zoom Brush
- Glitter Brushes
Static Animations
Warping Brushes in DP Animation Maker
Overview
Warping brushes in DP Animations produces animation effects by transforming, or warping, the image in accordance with certain algorithms. Use Warping brushes to make parts of the background move and to simulate different natural activities such as autumn leaves trembling in the wind, bird’s wings waggling, to make a banner flap and many more.
Rotation Brush can help you animate wheels and mechanisms. Drift Brush helps you add back-and-forward movements to your picture. Making characters on the picture breathe is effortless with Zoom Brush. With these and other Warping brushes you can achieve really fantastic results with little effort. Here are just a few examples:
Working with Brushes
To apply the effect of a brush to the slide, pick the brush and paint over the area where you want the effect to be.
When you paint with Warping brushes you create the mask of the effect. This mask determines areas of the scene where the effect will be applied, and its intensity. The intensity of the effect in different parts of the scene depends on the opacity of the effect mask. In order to make the effect mask visible, turn on the “Highlight effect area” option:
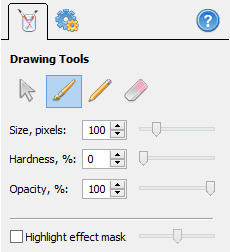
Drawing Tools
You can control the mask opacity by using different drawing tools and changing their parameters (see below).
You can select one of three drawing tools, or switch to the pointer that doesn’t do any drawing but allows you to select objects or to modify them. The other three tools are the pencil, brush and eraser. The pencil allows you to paint the effect mask using a sharp-edged circle pattern. The brush, on the other hand, has soft edges which are semi-transparent, so the effect blends with the background on the edges, and does not replace it.
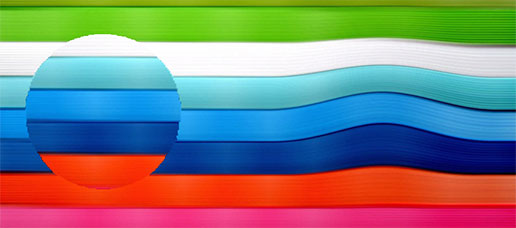
Drift effect with masks created by pencil (left) and brush (right)
The Eraser is for removing the effect completely or for correcting the effect mask.
You can adjust the Size of the tool, the Hardness and Opacity. Small values of hardness lead to softer edges of the brush and the eraser tools (the pen has 100% hardness). Reduce the value of opacity to achieve better transparency of a brush tool and softer blending of the applied warping effect with the background. Also, opacity allows you to control the intensity of the effect by making the entire mask more or less transparent.
The last important option that most Warping brushes have is the “Apply the effect to” option. It can be set to “background only” or “whole scene”. When the brush is applied to the background only, the effect uses only original pixels of the background, erasing all underlaying layers under the effect mask. If the brush is applied to the whole scene, the effect also affects all other animation layers under the effect mask. It allows you to apply several warping effects to one part of the image.
The following two images illustrate the difference:

Combination of Zoom brush and the Snow animation with the “background only” option (left) and “whole scene” (right )
Please refer to each particular section to learn more about specific brushes: