Getting Started
How to
Brushes
- Nature Brushes
- Warping Brushes
- Background Copy Brush
- Bend Brush
- Drift Brush
- Radial Wave Brush
- Rotation Brush
- Turn and Fold Brushes
- Wave Brush
- Zoom Brush
- Glitter Brushes
Static Animations
Light Brush
Description
Light Brush allows you to add animated lights of any kind to the image. Lighthouse searchlights, police car strobe lights, the glimmer of a candle or the soft flickering of a forest firefly – with Light Brush you can do almost anything.
How to use Light Brush
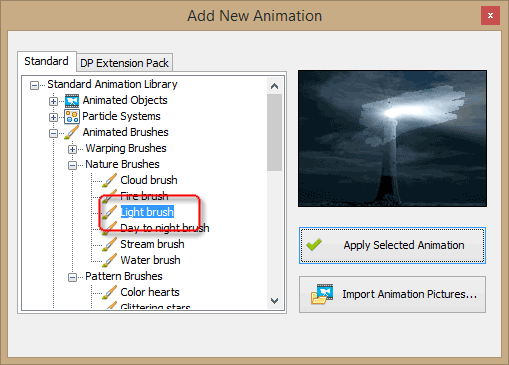
1. Select the Light Brush from the Add New Animation dialog. The brush is located under the “Animated Brushes” section in the “Nature Brushes” subsection.
2. Click “Apply Selected Animation”. This adds Light Brush to the list of Animations as shown below.
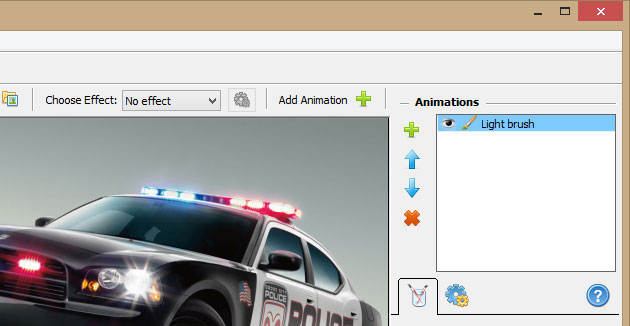
3. Now you can paint with Light Brush just like a normal brush. Paint the areas you want to glow (sparkle, glimmer, radiate etc.). You don’t need to be precise, just mark an approximate area of the light effect.

Brush Properties
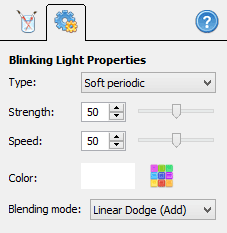
Here you can adjust the appearance and the behavior of light.
Type – determines how the intensity of light changes over time. There are four types of light animation in DP Animation Maker:
- Constant – the light glows constantly, without flickering. The main purpose of this option is to give precise control on light intensity through the timing controls. You can read more about this here. But it can also represent steady light sources such as a lighthouse, the headlights of a car, or an electric lamp.
- Soft periodic – the light flickers softly, slowly fading in and out as specified. Use this option to animate slowly pulsating or periodic lights such as: a fireplace, a street light, a hurricane lamp and so on.
- Pulsations – this type represents fast-changing lights such as the flashing lights on an emergency vehicle, direction indicators, warning lights, and other lights that should quickly alternate between on and off.
- Random – use this to animate non-constant, chaotic lights that are more random: For example, a candle flame, a bonfire, burning matches, etc. Note that we are speaking of the light effect here, not fire or flames.
Strength – this parameter defines the intensity of light. An alternative way to adjust the intensity of the effect is via the Opacity parameter of the brush and using the Animation Timing settings.
Speed – determines the frequency of pulsations for the last three light types. For instance, if you want to add an animated light effect to a fireplace picture, you should select medium or low values, because fireplaces emit a more or less steady light that doesn’t flicker quickly. However, for a sparkler animation, because of the nature of a sparkler’s light, you should stick to higher values.
Color – select the color of the light. You will usually stay with white or yellow light, but sometimes you may need more exotic colors such as red for sirens, orange for emergency lights, blue for gas oven flame and green for superhero blows or lightsaber radiance. Note that the resulting color is highly dependent on the background pixels and the selected blending mode (see below).
Blending mode – this option can be a bit tricky if you are unfamiliar with graphics editing. Here, you select how the effect should blend onto the picture.
- Normal - means the effect layer is put over the background without any color mixing. It is useful, for example, when you want to show that the background scene is bathed in one color.
- Screen - Gently increases brightness of the image. It is useful when you need to add the blinking effect to a part of the scene that is already very bright, like fire, for example.
- Color Dodge - Increases brightness of the light parts of the image leaving the dark parts almost untouched. It is useful when you have a complex image and want to animate only the light parts of it, for example, stars or windows of a house in a night scene..
- Linear Dodge - Increases brightness of the image more evenly. It is useful when you want to simulate presents of light sources in the scene, like a street lamp turning on/off.
- Sum (Brightness) - simply changes the brightness of the image on the constant value, provides backward compatibility with older versions.